4. Installation of DIMS Components on “Bare-metal”
This section describes installation of core Virtual Machine hypervisor servers, developer workstations, or collector devices on physical hardware. Installation of DIMS component systems in Virtual Machines is covered in Section Installation of DIMS Components Using Virtual Machines.
The initial operating system installation is handled using operating system installation media along with Kickstart auto-installation, followed by a second-stage pre-configuration step, and lastly by installation of required packages and configuration using Ansible.
A similar process is used to create Virtual Machines, though using Packer instead of stock OS installation ISO media plus Kickstart. This is covered in the dimspacker:lifecycle section of the dimspacker:dimspacker document.
4.1. Control and Target Prerequisites
For the control machine, the following must be true:
- Must be able to run DIMS Ansible playbooks (i.e. be an existing developer workstation).
- Must have the latest
dims-ci-utilsinstalled. That is, the latestdims.remote.setupworkstationscript should be in/opt/dims/bin.- Must have the required DIMS VPN enabled (so it can retrieve DIMS Git repos and artifacts on Jenkins requested by playbooks.)
Note
We are assuming the control machine is an existing workstation that has been successfully used to run DIMS playbooks and has at a minimum followed the original instructions for setting environment variables and installing
dims-ci-utils.
For the target machine, the following must be true:
- The base operating system is installed.
- An
ansibleaccount must be present, configured forsudoaccess for performing administrator tasks, with the matching public key allowing SSH access via the private key on the control machine.- Firewall rules must allow SSH access from the control machine.
4.2. Setting up a DIMS Developer Laptop
This section describes how to provision a new developer laptop using a custom bootable USB installation drive. Some of the steps are still manual ones, and these instructions will be updated as a more script-driven process is created. For now, this can serve to help guide the creation of the final process.
To acheive a repeatable and consistent process for installing a common base operating system (in this case, Ubuntu 14.04 LTS) that is ready to immediately be provisioned remotely from an Ansible control node, a customizable Ubuntu installation USB drive is used with all of the files necessary to go from a fresh computer system to a fully-functional networked host.
All of the steps for preparing an initial installation USB are given below, in the order they need to be performed. Once completed, you will have a bootable USB drive and a bit-copy of that drive that can be re-used.
Note
If you already have a bit-copy of one of these installation USB drives, skip to the Cloning an installation USB section.
If you already have a fresh (uncustomized) installation USB disk, skip forward to the Customizing an installation USB section.
Note
The DIMS project purchased a number of Dell Precision M4800 laptops for
use for development and demonstration purposes. These laptops require the
use of proprietary drivers for the Broadcom Wireless NIC and NVIDIA
graphics controller. The specific models can be identified using lspci:
$ lspci -knn | grep -i Broadcom
03:00.0 Network controller [0280]: Broadcom Corporation BCM4352 802.11ac Wireless Network Adapter [14e4:43b1] (rev 03)
$ lspci | grep VGA
01:00.0 VGA compatible controller: NVIDIA Corporation GK107GLM [Quadro K1100M] (rev a1)
These drivers can be installed manually using the Ubuntu Additional Drivers app as seen in Figure Additional Drivers from working laptop.
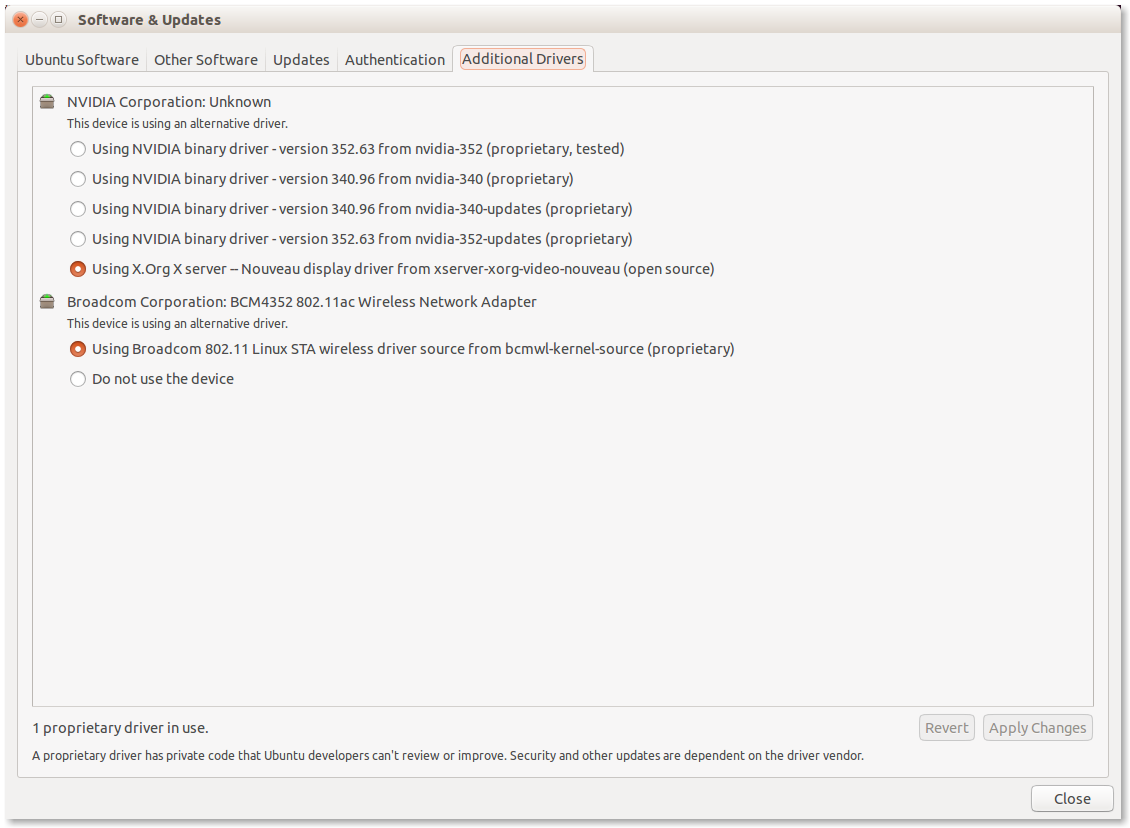
Additional Drivers from working laptop
There is prototype code in the Ubuntu post-install script designed to automate this task based on information from How can I install Broadcom Wireless Adapter BCM4352 802.11ac PCID [14e4:43b1] (rev 03) on fresh install of Ubuntu 14.10 (Utopic Unicorn)?, which is essentially:
$ sudo apt-get update
$ sudo apt-get install bcmwl-kernel-source
$ sudo modprobe wl
4.2.1. Preparation of Ubuntu installation USB drive
This section describes the manual steps used to create a two-partition
8GB Ubuntu installation USB drive. The following section describes
the use of the program dims.install.createusb to bit-image copy
this drive, store it for shared use by DIMS team members, and
use this image copy to clone the original USB drive and then
populate it with custom information to be used when auto-installing
Ubuntu 14.04 on a development laptop using this customized USB
drive.
Note
Start out by studying the --help output of dims.install.createusb
to understand the defaults it uses (shown by the highlighted lines in the
following code block). These defaults are hard-coded into the program
and should be updated when new Ubuntu install ISO images are used.
Some of the command examples below make use of these defaults (rather
than explicitly including all options on the command line.)
 Usage: dims.install.createusb [options] [args]

 Use "dims.install.createusb --help" to see help on command line options.

 Options:
   -h, --help            show this help message and exit
   -d, --debug           Enable debugging.
   -D DEVICE, --device=DEVICE
                         Device file for mounting USB. [default: sdb]
   -H HOSTNAME, --hostname=HOSTNAME
                         Hostname of system to install. [default dimsdev3]
   -l USBLABEL, --usblabel=USBLABEL
                         USB device label. [default: DIMSINSTALL]
   --ubuntu-base=UBUNTUBASE
                         Ubuntu base version. [default: 14.04]
   --ubuntu-minor=UBUNTUMINOR
                         Ubuntu minor version. [default: 4]
   --base-configs-dir=BASE_CONFIGS_DIR
                         Base directory for configuration files. [default:
                         /opt/dims/nas/scd]
   -u, --usage           Print usage information.
   -v, --verbose         Be verbose (on stdout) about what is happening.

   Development Options:
     Caution: use these options at your own risk.

     --find-device       Attempt to find USB device actively mounted and exit.
     --empty-casper      Empty out all contents (except lost+found) from
                         casper-rw and exit.
     --ls-casper         Just list contents of casper-rw file system.
     --label-casper      Put --usblabel into casper-rw and exit.
     --mount-casper      Mount casper-rw in cwd and exit.
     --umount-casper     Unmount casper-rw and exit.
     --mount-usb         Mount DIMS install USB and exit. [default: sdb]
     --unmount-usb       Unmount DIMS install USB and exit. [default: sdb]
     --read-usb-into     Read USB drive into file. [default: False]
     --write-usb-from    Write USB drive from file. [default: False]
     -f IMAGEFILE, --imagefile=IMAGEFILE
                         File name to use for storing compressed USB image.
                         [default: ubuntu-14.04.4-install.dd.bz2]
     --block-size=BLOCK_SIZE
                         Block size to use for 'dd' read/write. [default: 512]
4.2.1.1. Partition USB drive
If you are starting out with a blank USB drive, you must first partition the drive and label it so it is recognizable by DIMS scripts. An easy program to use for this purpose on Ubuntu is the Gnome Partition Editor (a.k.a., GParted).
Figure GParted formatting and labeling shows an 8GB USB drive partitioned using GParted. Create
two partitions with the primary partition (shown here as /dev/sdb1) marked
as bootable, with a FAT32 file system, and labeled DIMSINSTALL.
Make the second partition an ext3 file system and label it DIMSBACKUP.
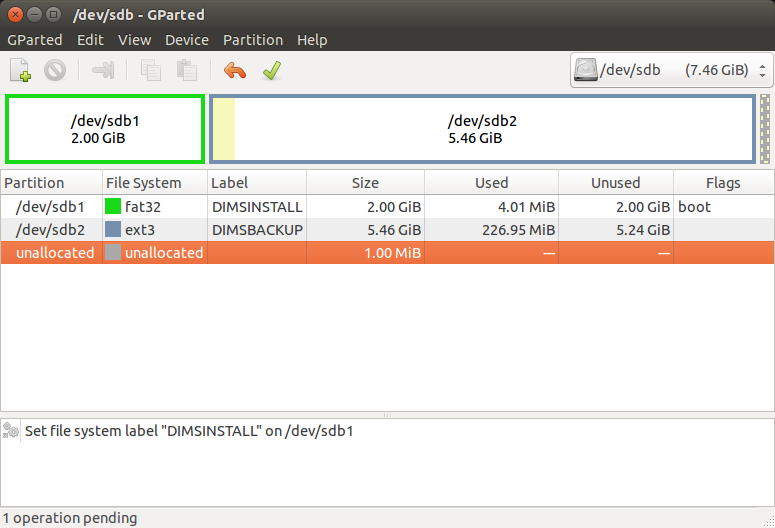
GParted formatting and labeling
The paritions can also be shown using fdisk -l (here assuming the disk
is mounted as /dev/sdb).
[dittrich@dimsdev2 git]$ sudo fdisk -l /dev/sdb

Disk /dev/sdb: 8009 MB, 8009023488 bytes
247 heads, 62 sectors/track, 1021 cylinders, total 15642624 sectors
Units = sectors of 1 * 512 = 512 bytes
Sector size (logical/physical): 512 bytes / 512 bytes
I/O size (minimum/optimal): 512 bytes / 512 bytes
Disk identifier: 0x000cc03e

   Device Boot      Start         End      Blocks   Id  System
/dev/sdb1   *        2048     4196351     2097152    b  W95 FAT32
/dev/sdb2         4196352    15640575     5722112   83  Linux
Note
The dims.install.createusb script looks for a partition with the
label DIMSINSTALL and will not manipulate drives that do not
contain a partition with this label.
Note
The second partition can be used for backing up a user’s directory contents prior to re-installation of the operating system on a system. Since the kickstart process automatically partitions the hard drive, existing contents would be lost.
4.2.1.2. Create Ubuntu installation USB
Installation of Ubuntu on a developer system is performed using the Server
installation image (e.g., ubuntu-14.04.4-server-amd64.iso).
The program
to use for this purpose is the Ubuntu Startup Disk Creator. Run it
with root privileges (as they are needed to write the Master Boot
Record on the USB drive).
$ sudo usb-creator-gtk &
After downloading the Ubuntu Server installation ISO and verifying its integrity using the signed SHA256 hash files, write the installation ISO to the partitioned USB.
The primary partition (i.e., /dev/sdb1) is where the
Ubuntu installation ISO image (and casper-rw file system storage file,
where DIMS customization files will be stored) will be written. Make sure
that the option is checked to store files across boots, which will create
a casper-rw partition image within the startup disk image.
Note
The second partition does not show up because it is not marked as bootable, though it may be mounted and visible using the File viewer.
Figure Ubuntu Make Startup Disk shows what the Ubuntu Startup Disk Creator GTK application will look like at this step.
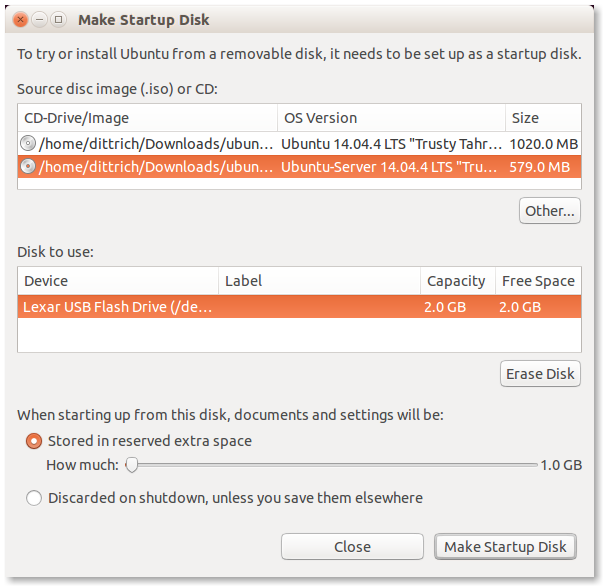
Ubuntu Make Startup Disk
Note
If you have to re-create the DIMSINSTALL partition with the
Startup Disk Creator, it will erase the entire partition (which
removes the label). To manually change the label, use GNU’s GParted
Partition Editor as described in the Ubuntu RenameUSBDrive page.
First verify the device name (so you don’t accidentally harm another
auto-mounted device), then use mlabel as seen here:
 $ mount | grep '^/dev/sd'
 /dev/sda1 on /boot type ext3 (rw)
 /dev/sdb1 on /media/dittrich/917D-FA28 type vfat (rw,nosuid,nodev,uid=1004,gid=1004,shortname=mixed,dmask=0077,utf8=1,showexec,flush,uhelper=udisks2)
 /dev/sdb2 on /media/dittrich/DIMSBACKUP type ext3 (rw,nosuid,nodev,uhelper=udisks2)
 $ sudo mlabel -i /dev/sdb1 ::DIMSINSTALL
Now unmount and re-mount the device, and verify that the label did in fact get changed.
 $ dims.install.createusb --unmount-usb
 $ dims.install.createusb --mount-usb
 $ mount | grep '^/dev/sd'
 /dev/sda1 on /boot type ext3 (rw)
 /dev/sdb1 on /media/dittrich/DIMSINSTALL type vfat (rw,nosuid,nodev,uid=1004,gid=1004,shortname=mixed,dmask=0077,utf8=1,showexec,flush,uhelper=udisks2)
 /dev/sdb2 on /media/dittrich/DIMSBACKUP type ext3 (rw,nosuid,nodev,uhelper=udisks2)
4.2.1.3. Bit-copy installation USB for cloning
After creating a bootable Ubuntu installation USB (which has not yet been
customized for a specific host installation), a copy of the boot disk should be
made. This allows for the vanilla installation USB to be cloned to as many USB
drives as are needed, each then being uniquely customized. This customization
includes host name, SSH keys, SSH authorized_keys and known_hosts
files, OpenVPN certificates, and any other files used in the installation and
setup process necessary to result in a remotely Ansible configurable host.
$ dims.install.createusb --verbose --read-usb-into
[+++] dims.install.createusb
[+++] Reading USB drive on sdb into ubuntu-14.04.4-install.dd.bz2
15642624+0 records in
15642624+0 records out
8009023488 bytes (8.0 GB) copied, 1171.45 s, 6.8 MB/s
2498225+1 records in
2498225+1 records out
1279091271 bytes (1.3 GB) copied, 1171.51 s, 1.1 MB/s
[+++] Finished writing ubuntu-14.04.4-install.dd.bz2 in 0:19:31.506338 seconds
$ ls -l *.bz2
-rw-r--r-- 1 dittrich dittrich  837948365 Jan 18 18:57 ubuntu-14.04.2-install.dd.bz2
-rw-rw-r-- 1 dittrich dittrich 1279091271 Mar 25 21:49 ubuntu-14.04.4-install.dd.bz2
4.2.2. Cloning an installation USB
The previous section walked through the process of creating a skeleton Ubuntu auto-installation USB drive and bit-copying it to a compressed image file. This section describes how to take that compressed bit-copy and clone it to USB drives that are then customized for installing Ubuntu on specific bare-metal hosts for subsequent Ansible configuration.
We will assume that the previous steps were followed, producing
a clone of the Ubuntu 14.04.4 install ISO in a file named
ubuntu-14.04.4-install.dd.bz2, and that the USB drive we
will be cloning to is available as /dev/sdb.
Caution
Be sure that you confirm this is correct, since this script
does direct writes using dd, which can destroy the file
system if applied to the wrong drive! There was not enough time
to make this script more robust against use by someone who
is unfamilar with bit copy operations in Unix/Linux.
$ dims.install.createusb --write-usb-from --verbose
[+++] dims.install.createusb
[+++] Partition /dev/sdb12 is not mounted
[+++] Partition /dev/sdb11 is not mounted
[+++] Writing ubuntu-14.04.4-install.dd.bz2 to USB drive on sdb
dd: error writing ‘/dev/sdb’: No space left on device
15632385+0 records in
15632384+0 records out
8003780608 bytes (8.0 GB) copied, 2511.1 s, 3.2 MB/s

bzip2: I/O or other error, bailing out.  Possible reason follows.
bzip2: Broken pipe
        Input file = ubuntu-14.04.4-install.dd.bz2, output file = (stdout)
[+++] Wrote sdb to USB drive on ubuntu-14.04.4-install.dd.bz2 in 0:41:51.110440 seconds
Note
The dd error “No space left on device” and the bzip2
error “Broken pipe” are normal. This happens because the exact
number of blocks read from the disk in the copy operation precisely
matches the number of blocks coming from the compressed file,
which triggers a “disk full” condition. A direct read/write operation
on the device, rather than shelling out to dd, would be more
robust (but would also consume more time in coding that was not
available.)
4.2.3. Customizing an installation USB
The installation ISO is customized with SSH keys, OpenVPN certificates, etc., by inserting files from a common file share into the installation USB.
Danger
These files that are inserted into the USB are not encrypted, and neither are the installation USB’s file systems. This requires physical control of the USB disk. These files should either be encrypted with something like Ansible Vault, or the file system encrypted such that it is decrypted as part of the Ubuntu install process.
In order to make the necessary files available to any of the DIMS developers, an NFS file share is used. Alternatives remote file sharing protocols include SSHFS and SMB.
An environment variable CFG points to the path to the files used to
customize the installation ISO. At present, these are in directories with
the short name of the host to be installed (e.g., dimsdev3).
[dimsenv] dittrich@dimsdev3:/opt/dims/nas () $ echo $CFG
/opt/dims/nas/scd
[dimsenv] dittrich@dimsdev3:/opt/dims/nas () $ tree $CFG/dimsdev3
/opt/dims/nas/scd/dimsdev3
├── IP
├── openvpn-cert
│   ├── 01_uwapl_dimsdev3.conf
│   └── 02_prsm_dimsdev3.conf
├── PRIVKEY
├── REMOTEUSER
├── ssh-host-keys
│   ├── key_fingerprints.txt
│   ├── known_hosts.add
│   ├── ssh_host_dsa_key
│   ├── ssh_host_dsa_key.pub
│   ├── ssh_host_ecdsa_key
│   ├── ssh_host_ecdsa_key.pub
│   ├── ssh_host_ed25519_key
│   ├── ssh_host_ed25519_key.pub
│   ├── ssh_host_rsa_key
│   └── ssh_host_rsa_key.pub
└── ssh-user-keys
    ├── ubuntu_install_rsa
    └── ubuntu_install_rsa.pub

3 directories, 17 files
Note
The OpenVPN certificates are created by hand. Two separate VPNs were originally used as hardware was split between two separate server rooms on two separate subnets, each with non-routable (RFC 1918) VLANs behind the VPNs. Hardware was moved into one data center and this will be reduced to one VPN as soon as VM consolidation and cabling changes can be made to use a single VLAN.
Note
The IP, PRIVKEY, and REMOTEUSER files hold the values used by
some DIMS scripts for setting variables used for remotely provisioning the
host using Ansible. We are migrating to using group_vars and/or
host_vars files for holding these values so they can be shared by
other scripts and used in Jinja templates.
New SSH host key sets can be generated using keys.host.create.
[dimsenv] dittrich@dimsdemo1:/opt/dims/nas () $ keys.host.create -d $CFG/dimsdev3/ssh-host-keys/ -v -p dimsdev3
[+++] Storing files in /opt/dims/nas/scd/dimsdev3/ssh-host-keys/
[+++] Removing any previous keys and related files
[+++] Generating 1024 bit dimsdev3 ssh DSA key
[+++] Generating 2048 bit dimsdev3 ssh RSA key
[+++] Generating 521 bit dimsdev3 ssh ECDSA key
[+++] Generating 1024 bit dimsdev3 ssh ED25519 key
[+++] Key fingerprints
1024 70:0e:ee:8b:23:34:cf:34:aa:3b:a0:ca:fd:50:58:a9  'dimsdev3 ssh DSA host key' (DSA)
2048 7f:89:da:e7:4d:92:fd:c1:3f:96:4f:05:f5:72:63:65  'dimsdev3 ssh RSA host key' (RSA)
521 0a:af:c7:c4:a8:35:47:48:22:b3:7e:5b:bf:39:76:69  'dimsdev3 ssh ECDSA host key' (ECDSA)
256 b2:dd:be:36:4d:03:a4:57:17:fb:a9:a9:97:e5:58:51  'dimsdev3 ssh ED25519 host key' (ED25519)
[dimsenv] dittrich@dimsdemo1:/opt/dims/nas () $ ls -l $CFG/dimsdev3/ssh-host-keys
total 18
-rw-rw-r-- 1 nobody nogroup  362 Apr  4 11:24 key_fingerprints.txt
-rw-rw-r-- 1 nobody nogroup 1304 Apr  4 11:24 known_hosts.add
-rw------- 1 nobody nogroup  668 Apr  4 11:24 ssh_host_dsa_key
-rw-r--r-- 1 nobody nogroup  617 Apr  4 11:24 ssh_host_dsa_key.pub
-rw------- 1 nobody nogroup  361 Apr  4 11:24 ssh_host_ecdsa_key
-rw-r--r-- 1 nobody nogroup  283 Apr  4 11:24 ssh_host_ecdsa_key.pub
-rw------- 1 nobody nogroup  432 Apr  4 11:24 ssh_host_ed25519_key
-rw-r--r-- 1 nobody nogroup  113 Apr  4 11:24 ssh_host_ed25519_key.pub
-rw------- 1 nobody nogroup 1679 Apr  4 11:24 ssh_host_rsa_key
-rw-r--r-- 1 nobody nogroup  409 Apr  4 11:24 ssh_host_rsa_key.pub
Note
The equivalent script to generate SSH user keys has not yet been written,
but an early helper Makefile is available to perform these steps in a
consistent manner. The highest level of security is acheived by having
unique SSH keys for each account, however this would significantly
complicate use of Ansible, which is designed to control a large number of
hosts in a single run. Each DIMS instance being controlled by Ansible will
thus have a shared key for the Ansible account that, at most, is unique to
a deployment and/or category.
[dimsenv] dittrich@dimsdemo1:~/dims/git/dims-keys/ssh-pub (develop*) $ DIMSUSER=ansible make genkey
ssh-keygen -t rsa \
                -C "DIMS key for ansible" \
                -f dims_ansible_rsa
Generating public/private rsa key pair.
dims_ansible_rsa already exists.
Overwrite (y/n)? y
Enter passphrase (empty for no passphrase):
Enter same passphrase again:
Your identification has been saved in dims_ansible_rsa.
Your public key has been saved in dims_ansible_rsa.pub.
The key fingerprint is:
06:52:35:82:93:73:8b:e8:0f:7a:15:f4:44:29:a2:b8 DIMS key for ansible
The key's randomart image is:
+--[ RSA 2048]----+
|     ++oo        |
|  . B.+. .       |
| . -.O.          |
| o. o.o.         |
| o   .  S        |
| Eo .  .         |
| . +             |
| . . .           |
|  .              |
+-----------------+
ssh-keygen -l \
        -f dims_ansible_rsa.pub > dims_ansible_rsa.sig
[dimsenv] dittrich@dimsdemo1:~/dims/git/dims-keys/ssh-pub (develop*) $ ls -lat | head
total 128
-rw-rw-r--  1 dittrich dittrich   81 Nov 15 14:58 dims_ansible_rsa.sig
-rw-------  1 dittrich dittrich 1675 Nov 15 14:58 dims_ansible_rsa
-rw-rw-r--  1 dittrich dittrich  402 Nov 15 14:58 dims_ansible_rsa.pub
  . . .
[dimsenv] dittrich@dimsdemo1:~/dims/git/dims-keys/ssh-pub (develop*) $ mv dims_ansible_rsa* $CFG/zion/ssh-user-keys/
After all keys, certificates, etc., are installed in the new host’s directory
in $CFG, you can write the contents to the installation USB disk partition.
[dimsenv] dittrich@dimsdemo1:/git/dims-ci-utils/usb-install (develop*) $ dims.install.createusb --help
Usage: ./dims.install.createusb [options] [args]

Use "./dims.install.createusb --help" to see help on command line options.


Options:
  -h, --help            show this help message and exit
  -d, --debug           Enable debugging.
  -D DEVICE, --device=DEVICE
                        Device file for mounting USB. [default: sdb]
  -H HOSTNAME, --hostname=HOSTNAME
                        Hostname of system to install. [default dimsdemo1]
  -l USBLABEL, --usblabel=USBLABEL
                        USB device label. [default: DIMSINSTALL]
  --distro-version=DISTROVERSION
                        Distribution version. [default: 14.04.5]
  --base-configs-dir=BASE_CONFIGS_DIR
                        Base directory for configuration files. [default:
                        /opt/dims/nas/scd]
  -u, --usage           Print usage information.
  -v, --verbose         Be verbose (on stdout) about what is happening.
  -V, --version         Print version and exit.

  Development Options:
    Caution: use these options at your own risk.

    --find-device       Attempt to find USB device actively mounted and exit.
    --empty-casper      Empty out all contents (except lost+found) from
                        casper-rw and exit.
    --ls-casper         Just list contents of casper-rw file system.
    --label-casper      Put --usblabel into casper-rw and exit.
    --mount-casper      Mount casper-rw in cwd and exit.
    --unmount-casper    Unmount casper-rw and exit.
    --mount-usb         Mount DIMS install USB (sdb) and exit. [default:
                        False]
    --unmount-usb       Unmount DIMS install USB (sdb) and exit. [default:
                        False]
    --read-usb-into     Read USB drive into file. [default: False]
    --write-usb-from    Write USB drive from file. [default: False]
    -f IMAGEFILE, --imagefile=IMAGEFILE
                        File name to use for storing compressed USB image.
                        [default: ubuntu-14.04.5-install.dd.bz2]
    --block-size=BLOCK_SIZE
                        Block size to use for 'dd' read/write. [default: 512]
[dimsenv] dittrich@dimsdemo1:/git/dims-ci-utils/usb-install (develop*) $ dims.install.createusb --hostname zion
After installing the operating system using the Kickstart customized
USB drive, the system should be able to access the network. Test using
ping 8.8.8.8 to verify network connectivity and a default route.
Install an initial clouds.yml file to configure dimscli:
[dimsenv] ansible@zion:~ () $ cat ~/.config/openstack/clouds.yml
clouds:
  ectf:
    profile: ectf
    prefer_ipv6: False
    force_ipv4: True
    consul_peers: ['node01.ops.ectf','node02.ops.ectf','node03.ops.ectf']
    region_name: ectf
    debug: True